Sensitivity Matching Guide
If you’re an FPS player who plays different games, you may be interested in maintaining consistent aim in all of them. If you’re lucky, the game lets you change the mouse sensitivity by typing in whatever value you want, which makes things a lot easier than if it doesn’t. Either way, this guide will help you. In the first case, it will help you find the perfect sensitivity quicker, and in the latter case, it will enable you to find it to begin with.
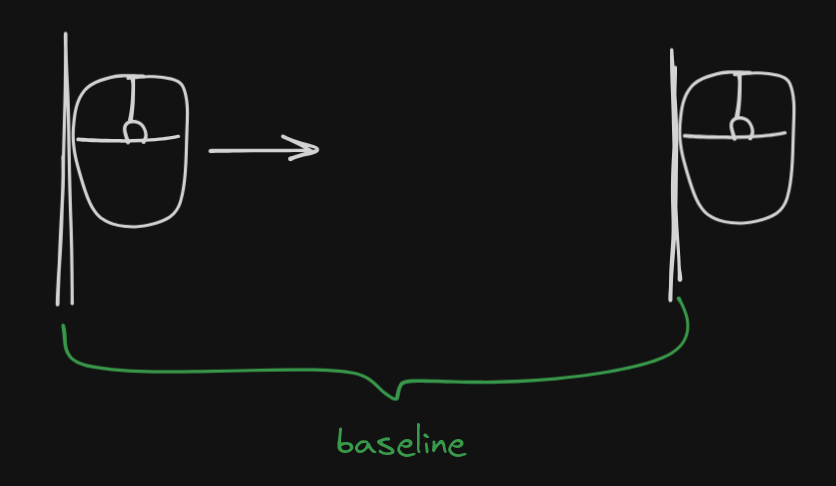
There are different ways of matching sensitivity between games, but everything starts by obtaining the sensitivity from a game you already have set up. This is called the baseline, and it’s usually measured in centimeters per 360 degrees (cm/360): the physical distance the mouse needs to be moved to perform a complete turn.
Once you have the baseline, you switch to another game and try to get as close as possible to the baseline you got from the first game.
Sometimes this may not be possibl; the settings in the second game may not be precise enough. For example, in single player games it’s quite common to have a slider with around 10 different values for sensitivity and nothing else.
If you use a high DPI, your options are even more limited. You might put the sensitivity on the lowest setting and the camera still spins like a whirlwind with the slightest movement.
That’s when you need software solutions. Perhaps your mouse has software that lets you adjust its DPI directly. Maybe even per game. That would be ideal.
Things are often less than ideal. But that’s okay; software like RawAccel let you adjust mouse sensitivity to your heart’s content. RawAccel does not, however, allow for game specific profiles, and that is why MoreAccel exists.
Anyway, let’s get on with the methods for matching sensitivity from one game to another.
Method 1 - Match Using a Converter
The first, and easiest method to match sensitivity from one game to another is to check if both games are supported by an online converter like mouse-sensitivity.com. A converter will likely work great if the game supports precise mouse sensitivity settings.
Method 2 - Match by Mousepad Distance
Get something you can draw on, like some paper or a piece of cardboard. It should be long enough that you can make a full turn ingame while keeping the mouse on it.
Obtaining the Baseline
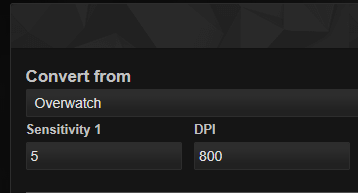
Pick a game you already have a comfortable sensitivity in. If it’s a game that you can find in a converter, you can just look up the cm/360. For example, I used to play Overwatch with a sensitivity of 5 at 800 DPI, so my cm/360 would be 34.6364.

If you got your cm/360 from the converter, mark it on the surface and skip to the next section. Otherwise, you’re going to have to get the distance manually.
Go ingame and aim at something you can use as a reference point, like the corner of a table.
Position your mouse on the left side of the surface. Mark down the position of the mouse, then move it to the right until you’ve made a full turn, returning the crosshair to the reference point. Mark down the position again. There’s your baseline. This would be the same distance as the cm/360 you’d get from a converter, if it supported your game.
Matching the Baseline to the Second Game
Now switch to the other game. Find a reference point for the crosshair like before. Starting from the first position you marked down, move the mouse to the right until you’ve made a full turn, returning the crosshair to the reference point.
If the mouse traveled a longer distance than the baseline, then the sensitivity in the second game is too low and you need to increase it.
If the mouse travaled a shorter distance than the baseline, then the sensitivity in the second game is too high and you need to decrease it.
Adjust the sensitivity in the game until you get as close to the baseline as possible.
This method is somewhat inaccurate due to having to measure things physically, so whem you feel like you’re getting close, it’s best to perform the same measurement a few times to increase accuracy.
If you can get close enough to the baseline, that’s great! But if you’re not satisfied with the result, you’ll need to adjust the mouse DPI further with either your mouse’s built-in software or RawAccel. Treat the DPI setting as sensitivity, and repeat the steps above.
Of course, the problem with adjusting the mouse DPI is that it’s a system-wide change, not just tied to your game, so you need to remember to change it when you want to play the game, and then change it back after you’re done.
If your mouse’s built-in software supports DPI adjustments and game-specific profiles, then you can of course use that.
On the other hand, while RawAccel does not support game-specific settings, MoreAccel does.
On the other had, while RawAccel does support different “profiles,” it does not support automatically switching between them. MoreAccel was built to fix that problem. The best you can do with RawAccel itself is creating shortcuts to different profiles. See the details below, in the “Switching RawAccel Profiles” section.
Method 3 - Match with KovaaK’s SensitivityMatcher
The idea here is pretty much the same as with Method 2, except that the physical measurement is replaced with software.
Download SensitivityMatcher and unpack if somewhere. Launch SensitivityMatcher.exe, then click on Physical Stats and enter your mouse DPI in the Mouse (ADC) field.
Obtaining the Baseline
Choose a game you already have a comfortable sensitivity in. Open the Select preset yaw menu and see if it’s already there. If it is, select it and write your ingame sensitivity in the Sens field and skip the next step.
If you can’t find a preset for your game, choose Measure any game from the list instead. Go into the game and aim at something you can use as a reference.
Press ALT-/ to start recording mouse movement, then turn around in a full circle, returning the crosshair to the reference point. Press ALT-/ again to stop recording mouse movement.
Using this initial measurement, you can press ALT-Backspace to tell the app to simulate a full turn. The goal is to get the turn to be as precise as possible. If the simulated turn is less than a full turn, press ALT-Plus. If it’s more than a full turn, press ALT-Minus.
Keep pressing ALT-Backspace and ALT-Plus or ALT-Minus until the simulated turn returns the crosshair to the exact same position.
If at any point you made a mistake by pressing ALT-Minus instead of ALT-Plus or ALT-Plus instead of ALT-Minus, you can press ALT-0 to start the process from scratch.
And if you want to be really meticulous and be certain you got it right, you can press SHIFT-ALT-Backspace to perform several full turns, which should also end up with the crosshair at exactly the reference point.
Matching the Baseline to the Second Game
Switch to the second game. Aim at a reference point like before, then press ALT-Backspace to simulate a full turn.
If the simulated turn is less than a full turn, you’ll need to decrease the sensitivity in SensitivityMatcher.
If the simulated turn is more than a full turn, the sensitivity in the second game is too high.
Adjust the sensitivity until you can get as close to a full turn as possible. Hopefully, the ingame settings will be enough to get you there. But if you’re not satisfied with the result, you’ll need to adjust the mouse DPI further with either your mouse’s built-in software or RawAccel.
Fine-tuning with RawAccel
If you decide to use RawAccel, write down your baseline sensitivity from SensitivityMatcher, because you’ll need to make some changes to it temporarily.
After installing RawAccel, reboot and launch the game. Open SensitivityMatcher again.
Just like before, aim at a reference point and press ALT-Backspace to simulate a full turn.
Now, if the simulated turn is less than a full turn, you’ll need to decrease the baseline sensitivity value in SensitivityMatcher.
If the simulated turn is more than a full turn, you’ll need to increase the baseline sensitivity vlaue in SensitivityMatcher.
(Before, you would have increased the sensitivity when the simulated turn was less than a full turn and increase it when it was over, but since you’re adjusting the baseline sensitivity, the operations are the opposite.)
Just like before, repeat until the simulated turn is exactly a full turn. After that’s done, you’ll have two numbers: the original baseline sensitivity in SensitivityMatcher that you wrote down, and the new, adjusted one.
For example, let’s say the original sensitivity was 5.00 and the adjusted value was 5.50. Divide the original value with the new one to get a multiplier for RawAccel: 5.00 / 5.50 = 0.909091
Open rawaccel.exe and set the sensitivity to the multiplier from above (0.909091 in this case). Press Apply.
And with that, you’re done. You can go back to SensitivityMatcher and restore the original baseline sensitivity.
You can test the result ingame; the aim should feel just right. Note, however, that if you try performing a full turn with SensitivityMatcher to confirm, it might seem like it doesn’t work right – at least that’s been my experience – but if you were to measure the result on the mousepad (Method 2), you would find that it is actually correct. There’s just some compatibility issue with how SensitivityMatcher simulates the full turn and how RawAccel modifies the input.
Of course, the thing with RawAccel is that it modifies the mouse sensitivity for everything, not just the game. While uou can set up shortcuts to set different “profiles,” you can’t activate them automatically. MoreAccel was built to fill that gap. But if you’re okay doing things manually, then look at the “Switching RawAccel Profiles” section below.
Switching RawAccel Profiles
RawAccel stores its settings in .json files that you can use kind of like profiles.
The RawAccel GUI (rawaccel.exe) always operates on the settings.json file (as far as I know). Before Making any changes to settings.json, I recommend copying it into a default.json.
Now you can make the game-specific changes in the GUI, click Apply, and copy settings.json to YourGame.json.
You should also see a writer.exe in the RawAccel direcory. For each different settings file (profile) create a shortcut to writer.exe and in the Target field, add a space and then write the name of the settings file.
You should end up with shortcuts that have targets like these:
C:\path\to\RawAccel\writer.exe default.jsonC:\path\to\RawAccel\writer.exe YourGame.json
Then you can just click the shortcuts to apply the profiles.
If this feels like too much work though, you can get MoreAccel to do this automatically for you.
Method 4 - Match with MoreAccel
This method works essentially the same way as Method 2, except we’re measuring “virtual” distance instead of physical distance on the mousepad.
If you want to see this in action, look here.
First things first, start MoreAccel and tick the box for Experimental Features to enable the Sensitivity Matcher feature. Then create a new profile in for your game by clicking the plus icon next to the list of profiles (if you just installed, it will only have a Default profile.)
Obtaining the Baseline
Go into a game you have a comfortable sensitivity in. In MoreAccel, click the Open Sensitivity Matcher button at the bottom of the window.
If you know your DPI and cm/360 (which you may have gotten from Method 1 or Method 2), you can click Set from DPI & cm/360 next to the Baseline value, then enter the values, click Save and move on to the next section.
Otherwise, click on Measure Baseline. Aim at something you can use as a reference point and press RCTRL to start measuring. Perform a full turn (or several, if you want to be extra accurate) and then return the crosshair to the reference point.
Press RCTRL again to finish, then input the number of turns you made and save the result.
That’s it. Go ahead and switch to the game you want to match sensitivity in.
Matching the Baseline to the Second Game
Once the second game is running, click Measure Game in MoreAccel’s Sensitivity Matcher. Aim at a reference point and press RCTRL to start. Perform a full turn and return to the reference point, then press RCTRL again to finish.
Now, while you can technically just hit Apply to adjust the global sensitivity based on the measurement and be done, it’s often best to try and get the result as close to 1 as possible using the ingame settings before applying changes through MoreAccel.
So with that in mind, keep pressing RCTRL to start and stop measuring until you’re as close to 1 as possible, adjusting the ingame sensitivity accordingly:
- if the value is under 1 (the distance traveled was less than baseline), decrease ingame sensitivity
- if the value is over 1 (the distance traveled was over the baseline), increase ingame sensitivity
If you can get close enough to 1 using the ingame settings you may not even need to use MoreAccel to further adjust the sensitivity, in which case you can just close the Sensitivity Matcher window.
Otherwise, click Apply to adjust the sensitivity the rest of the way with MoreAccel.
That’s it, you’re done.
One Final Tip
Games don’t always show a crosshair. This might be because you need to play a bit further to get something to shoot with, for example. In such cases you can use the corner of your screen (or any UI element) as a substitute for a crosshair, and find the reference points using that.
If you’re using MoreAccel 3.4.0 or later, you can also enable the Show Crosshair setting in the Sensitivity Matcher.